ZyWALL VPN2S Web Configurator unreachable


Hello,
It is really hard to access the Web Configurator on the VPN2S. In Chrome it is almost impossible because it automatically redirects to HTTPS (https://192.168.1.1) and doesn't accept the certificate so it doesn't load it. I could only access the Web Configurator in Internet Explorer with HTTP (http://192.168.1.1) but it is really slow. Usually when there is traffic on the VPN2S it takes ages to load the Web Configurator.
Please help me debug this issue. Thank you!
Best,
Mishi
Accepted Solution
-
Hi @Mishi,
Here is the test result when using IE11 to access the web configurator of VPN2S via HTTP.
Clear browsing history and enter http://192.168.1.1.
The web GUI is loaded immediately after http://192.168.1.1 is entered.
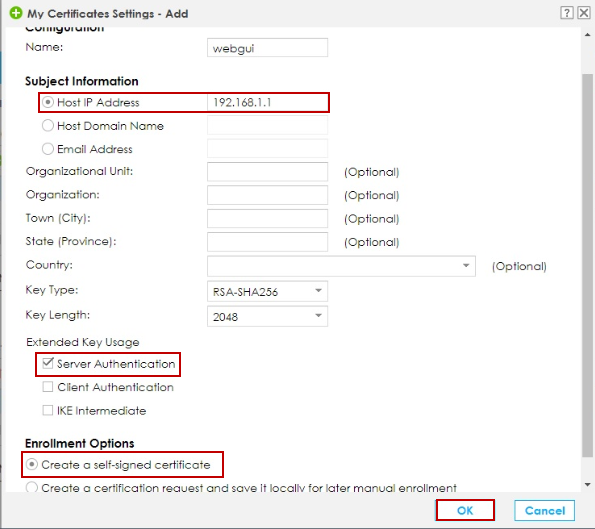
If you'd like to login web configurator without a warning page in the HTTPS page, create a self-signed certificate and import the certificate to the PC.
1. Configuration > Firewall/Security > Certificate > My Certificates Settings > Add.
2. View the certificate and click “Export Certificate Only”.


3. Go to Configuration > Firewall/Security > Device Service > Certificate. Select the certificate that you just created.

4. Right click the certificate and install the certificate on the laptop.
Go Next on the first installation page and select the “Trusted Root Certificate Authorities” to save the certificate.


5. Result
 5
5

 Zyxel Employee


All Replies
-
Hi @Mishi,
Here is the test result when using IE11 to access the web configurator of VPN2S via HTTP.
Clear browsing history and enter http://192.168.1.1.
The web GUI is loaded immediately after http://192.168.1.1 is entered.
If you'd like to login web configurator without a warning page in the HTTPS page, create a self-signed certificate and import the certificate to the PC.
1. Configuration > Firewall/Security > Certificate > My Certificates Settings > Add.
2. View the certificate and click “Export Certificate Only”.
3. Go to Configuration > Firewall/Security > Device Service > Certificate. Select the certificate that you just created.
4. Right click the certificate and install the certificate on the laptop.
Go Next on the first installation page and select the “Trusted Root Certificate Authorities” to save the certificate.
5. Result
5

Categories
- All Categories
- 397 Beta Program
- 2.1K Nebula
- 116 Nebula Ideas
- 78 Nebula Status and Incidents
- 5.1K Security
- 52 USG FLEX H Series
- 247 Security Ideas
- 1.3K Switch
- 70 Switch Ideas
- 907 WirelessLAN
- 34 WLAN Ideas
- 5.9K Consumer Product
- 211 Service & License
- 332 News and Release
- 71 Security Advisories
- 21 Education Center
- 5 [Campaign] Zyxel Network Detective
- 1.9K FAQ
- 880 Nebula FAQ
- 415 Security FAQ
- 221 Switch FAQ
- 195 WirelessLAN FAQ
- 46 Consumer Product FAQ
- 137 Service & License FAQ
- 34 Documents
- 34 Nebula Monthly Express
- 73 About Community
- 63 Security Highlight


