[NEBULA] How to set L2TP over IPSec VPN on NSG and end devices?
Options

Zyxel_Jason
Posts: 395  Zyxel Employee


Zyxel Employee
In Figure1,
there are multiple clients that want to access the server that is behind NSG. To
do that, the clients establish the L2TP over IPSec VPN tunnel to NSG.

Configuration Setting:
For NSG:
For Windows 10:
Figure 1 L2TP over IPSec VPN
All network IP addresses
and subnet masks are used as examples in this article. Please replace them with
your actual network IP addresses and subnet masks. This example was tested Nebula
gateway, switch, APs with the last firmware version on Nebula Center Control
(NCC).
Configuration Setting:
For NSG:
Go to "Configure > Security gateway > Remote access VPN" and configure the parameters.
Client VPN server: L2TP over IPSec client
Client VPN subnet: 192.168.100.0/24
DNS name severs: Use Google Public DNS
WINS: No WINS severs
Secret: <Pre-shared key>
Authentication: Nebula Cloud Authentication
- Go
to “Configure > Cloud authentication”, select Account
type “VPN User” and create(add) user.

Note: If you only want this account to access specific site via L2TP, you may select Specified sites in Authorized section. - Click
Save and make sure NSG’s configuration status is up to date.
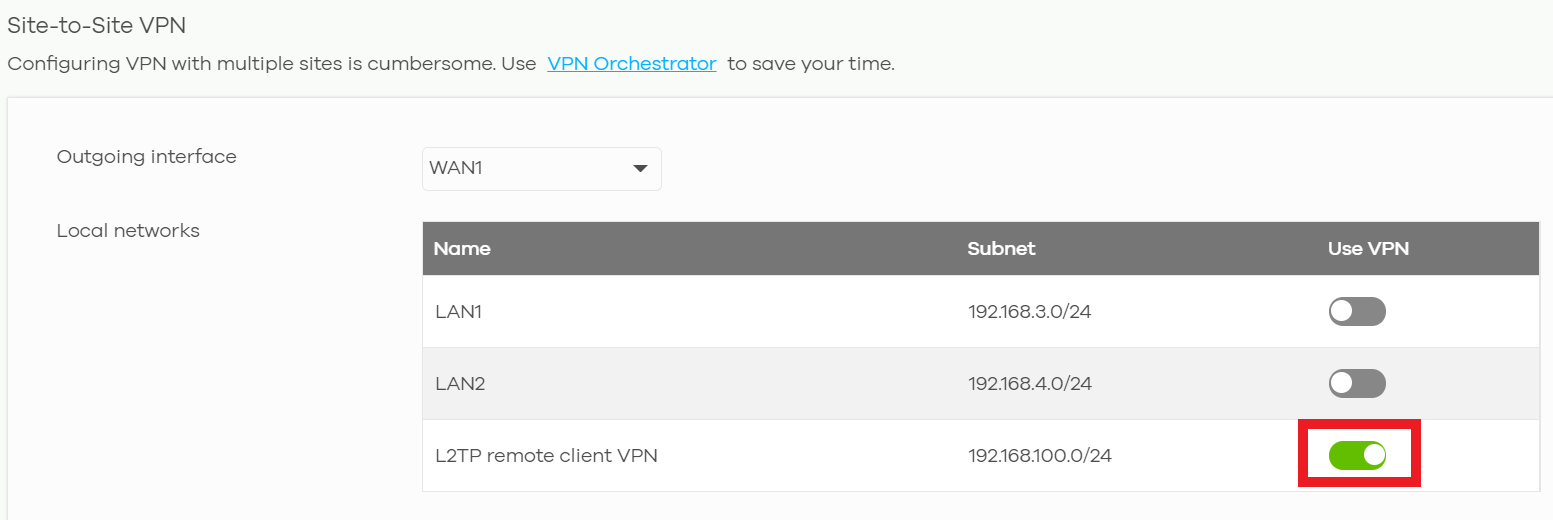
- Enable "Use VPN" at Security Gateway > Configure > Site-to-Site VPN page.
(Make LAN devices are pingable by L2TP client)
For Windows 10:
- Create
VPN profile.
"Settings > Network & Internet > VPN > Add a VPN connection" - Configure
required information and click Save.

- Create
VPN profile.
"System Preferences > Network"
- Configure
required information including NSG’s public IP and account name. Click
Authentication Settings to setup passwords and shared secret(Pre-shared key)


- Click
Advanced and check “Send all traffic over VPN connection”

- Create
VPN connection.
"Settings > Network > VPN" and choose L2TP
- Configure
required information including NSG’s public IP, account name and password.

- Configure Pre-shared
key.
Also, “3des-sha1-modp1024” for Phase 1 and
“3des-sha1” for Phase 2

- Create
VPN connection.

- Create
VPN connection.

- Click
connect.

- On Windows 10

Ping the server
On NSG, "Security gateway > Monitor > VPN connection".
- On MAC
OS

Ping the server
On NSG, "Security gateway > Monitor > VPN connection".
- On Linux
Ubuntu (Open terminal and use “ifconfig” commands)

Ping the server
On NSG, "Security gateway > Monitor > VPN connection".
- On iPhone

Ping the server
On NSG, "Security gateway > Monitor > VPN connection".
- On
Android

Ping the server
On NSG, "Security gateway > Monitor > VPN connection".
Jason
Tagged:
2
Categories
- All Categories
- 385 Beta Program
- 2.1K Nebula
- 116 Nebula Ideas
- 80 Nebula Status and Incidents
- 5.1K Security
- 74 USG FLEX H Series
- 247 Security Ideas
- 1.3K Switch
- 70 Switch Ideas
- 907 WirelessLAN
- 34 WLAN Ideas
- 5.9K Consumer Product
- 210 Service & License
- 334 News and Release
- 71 Security Advisories
- 21 Education Center
- 5 [Campaign] Zyxel Network Detective
- 1.9K FAQ
- 886 Nebula FAQ
- 415 Security FAQ
- 228 Switch FAQ
- 198 WirelessLAN FAQ
- 46 Consumer Product FAQ
- 137 Service & License FAQ
- 34 Documents
- 34 Nebula Monthly Express
- 73 About Community
- 63 Security Highlight