How to use ACL to mirror traffic of a specific criteria

 Zyxel Employee


The port mirroring feature allows user to duplicate a traffic flow to the monitor port in order to examine/monitor the traffic from the monitor port without interference. It’s useful for troubleshooting or scenarios involving supervisory control.
However, there are some cases that monitor port somehow receives numbers of various traffic when mirrored port is the up/down link port between devices. See the example below:

Let’s say there are numerous switches and clients under switch 1 in the network.
In case that PC 1 is the monitor PC, and the goal is to monitor the communication between PC2 and the internet.
In general, port 1 will be set as the monitor port and port 9 should be the mirrored port with “both” directions.

The approach is intuitive but it sometimes leads to a large amount of mirrored packets since port 9 of switch 1 is the aggregated uplink port to internet in the topology, all the downlink traffic will be converged. It’s inconvenient and troublesome to sort out the particular traffic to/from PC2 among an overload of miscellaneous info in the mirrored traffic.
In the following content, it contains a detailed procedure “filtering” the mirrored packets by implementing ACL mirroring in order to monitor traffic of a specific criteria.
Note:
All network addresses and subnet masks are used as examples in this article. Please replace them with your actual network configuration.
1. Configuration of ACL
1-1. Access the web GUI of the Switch-1.
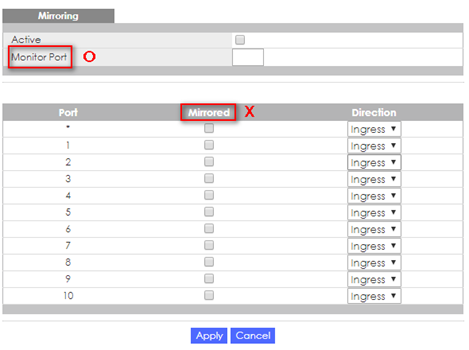
1-2. Go to Advanced Application > Mirroring. Activate and set port 1 as the Monitor Port.

1-3. Go to Advanced Application > Classifier > Classifier Configuration > Classifier Global Setting.
Set Match Order as “manual”, activate “Logging”, and apply.

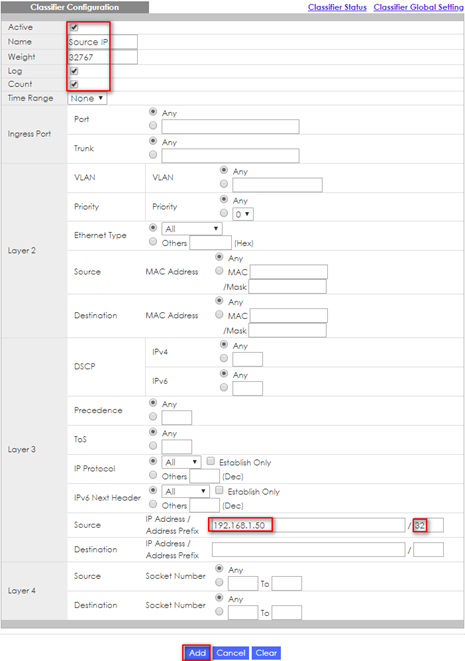
1-4. Go to Advanced Application > Classifier > Classifier Configuration.
Activate with name “Source IP”, and Weight 32767.
Check “Log” & “Count”.
Set Source IP address as PC 2’ IP, Address Prefix “32”, and then click “Add” to create.
1-5. Go to Advanced Application > Classifier > Classifier Configuration.
Activate with name “Destination IP”, and Weight 32766.
Check “Log” & “Count”.
Set Destination IP address as PC 2’ IP, Address Prefix “32”, and then click “Add” to create.

1-6. Go to Advanced Application > Policy Rule.
Activate with name “Mirror”.
Select both “Source IP” and “Destination IP” for classifiers.
Check “Send the packet to the mirror port” for Outgoing Action, and click “Add” to create.

2. Test the Result
2-1. Go to Advanced Application > Classifier.
The match count number of both classifiers should increase as long as PC 2 is communicating with internet.

2-2. Use Wireshark to conduct packet capturing on PC1.
The mirrored traffic of PC2 should be included.

3. What May Go Wrong
3-1. In Advanced Application > Policy Rule, there is the Outgoing Action “Send the packet to the mirror port”.
The mirror port here stands for the「Monitor Port」but NOT the「Mirrored Port」in Advanced Application > Mirroring.
Categories
- All Categories
- 384 Beta Program
- 2.1K Nebula
- 117 Nebula Ideas
- 80 Nebula Status and Incidents
- 5.1K Security
- 78 USG FLEX H Series
- 247 Security Ideas
- 1.3K Switch
- 69 Switch Ideas
- 907 WirelessLAN
- 34 WLAN Ideas
- 5.9K Consumer Product
- 209 Service & License
- 335 News and Release
- 71 Security Advisories
- 21 Education Center
- 5 [Campaign] Zyxel Network Detective
- 1.9K FAQ
- 898 Nebula FAQ
- 415 Security FAQ
- 234 Switch FAQ
- 205 WirelessLAN FAQ
- 46 Consumer Product FAQ
- 137 Service & License FAQ
- 34 Documents
- 34 Nebula Monthly Express
- 73 About Community
- 62 Security Highlight