How to Configure Captive Portal with QR Code?
Options

Zyxel_KathyLin
Posts: 58  Zyxel Employee


Zyxel Employee
The example instructs how to set up captive portal authentication with QR code. This new feature offers two convenient and fast methods to access the Internet. The first method is authenticator assisted. This means that the employees are the authenticators, who can authenticate the guest to access the Internet. The second method is self-serviced. The guest can use a mobile device to scan the QR code to pass the authentication.
The Captive portal with QR code can be utilized for some applications including private enterprises, schools, seminars, meetings and guests to access the network through the duration of their visit.

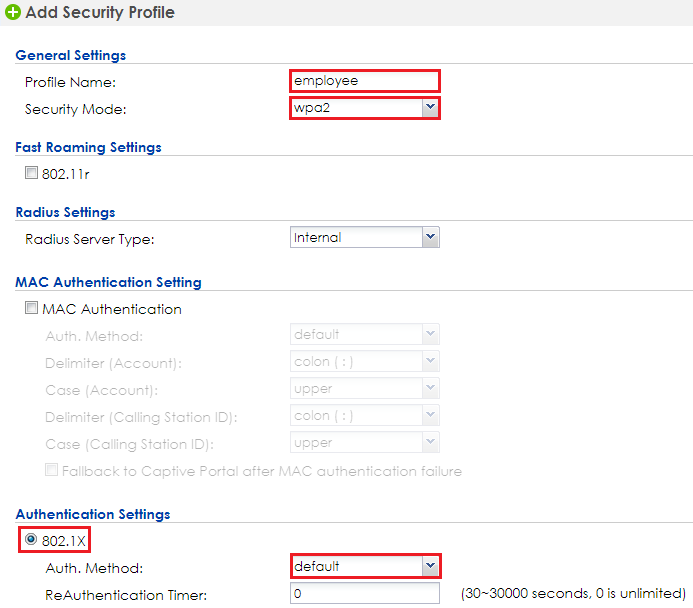
2 Go to CONFIGURATION > Object > AP Profile > SSID > Security List, Click Add to add the security profile for employees. Key in the Profile Name and SSID to employee. Click OK to save.
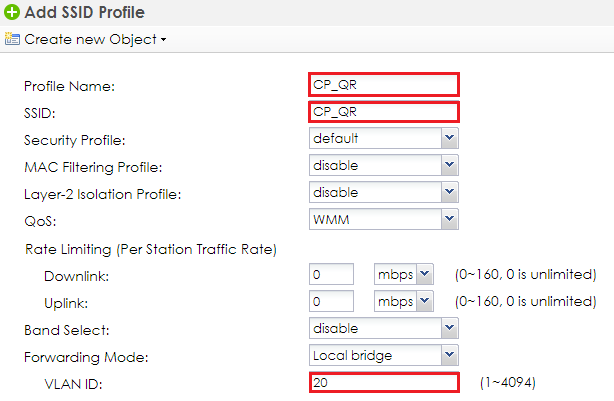
3 Go to CONFIGURATION > Object > AP Profile > SSID > SSID List, double click Add to add the SSID for employees. Key in the Profile Name and SSID to CP_employee with VLAN ID 10, and change Security Profile to employee. Click OK to save.

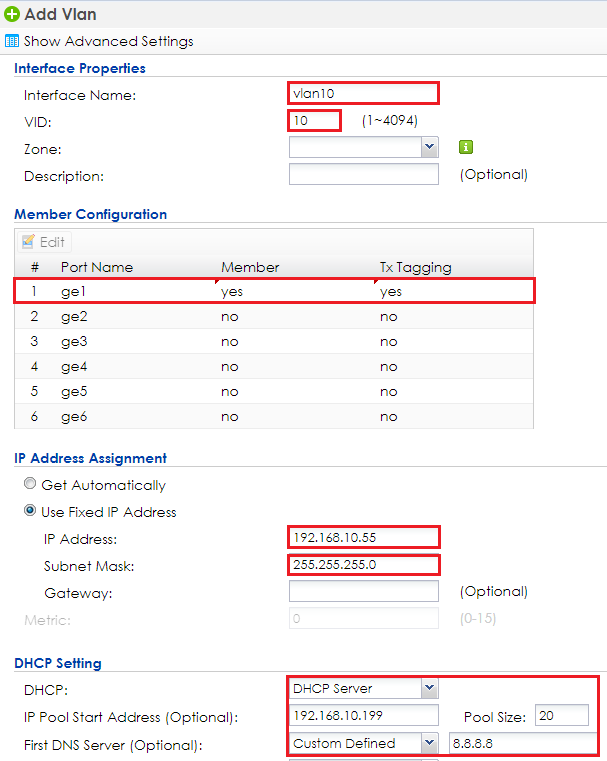
Configure VLAN 1 Go to CONFIGURATION > Network > Interface > VLAN, click Add to add VLAN 10 and set NXC2500 as the DHCP server of VLAN 10. Click OK to save.
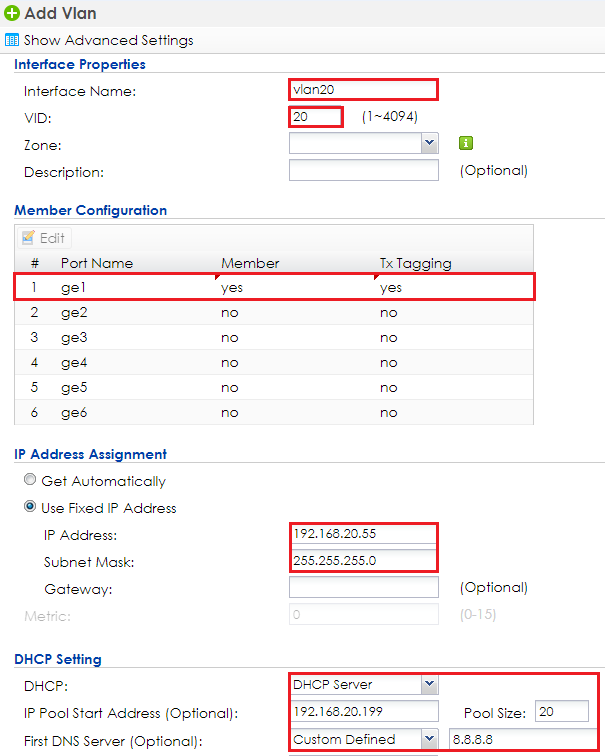
2 Go to CONFIGURATION > Network > Interface > VLAN, click Add to add VLAN 20 and set NXC2500 as the DHCP server of VLAN 20. Click OK to save.
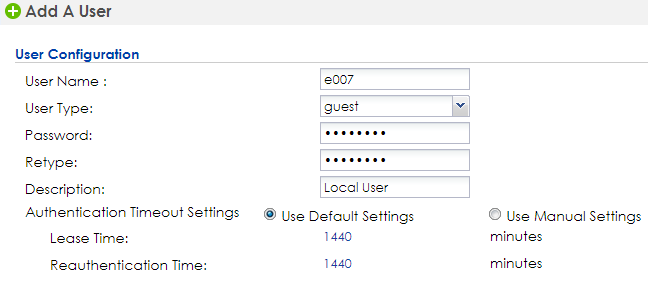
Create Assistance Account 1 Go to CONFIGURATION > Object > User/Group > User, and click Add to add the user as the assistance account for employees to help the guest pass the authentication when the guest scan the QR code. Click OK to save.
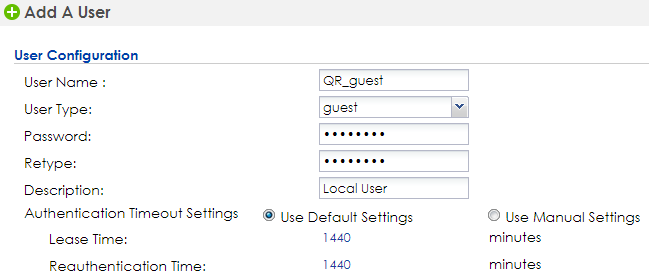
2 Go to CONFIGURATION > Object > User/Group > User, and click Add to add the user as the assistance account to let guest self-authenticate. Click OK to save.
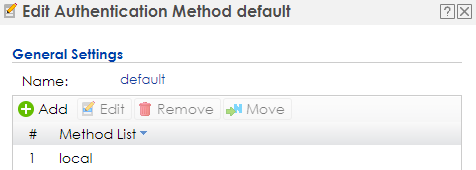
3 Go to CONFIGURATION > Object > Auth. Method > Authentication Method, and double click default to edit the method as local. Click OK to save.
Set Guest Address & Zone
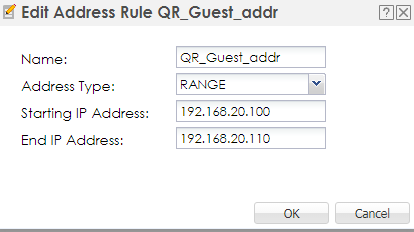
1 Go to CONFIGURATION > Object > Address > Address, click Add to add the guest address. Change the Address Type to RANGE and enter the starting and end IP address. Click OK to save.
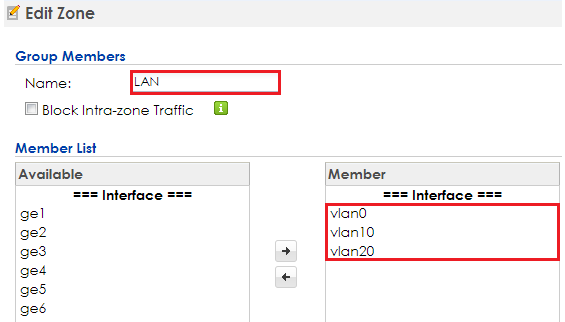
2 Go to CONFIGURATION > Network > Zone, click LAN to edit. Change vlan0, vlan10, vlan20 to the same zone and then the employee’s account can help to do captive portal authentication. Click OK to save.
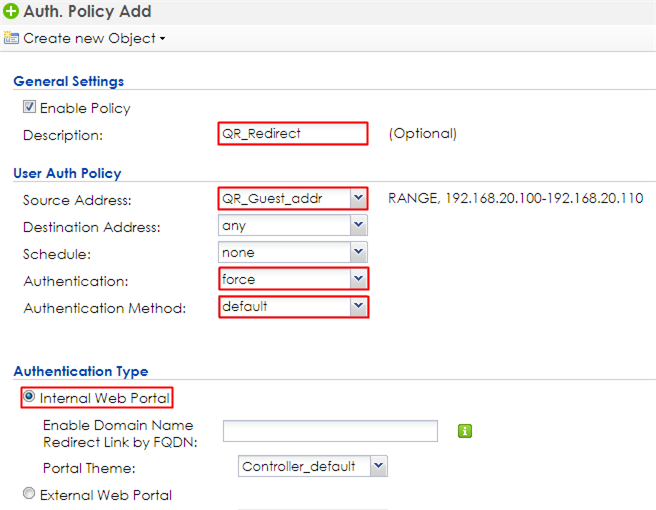
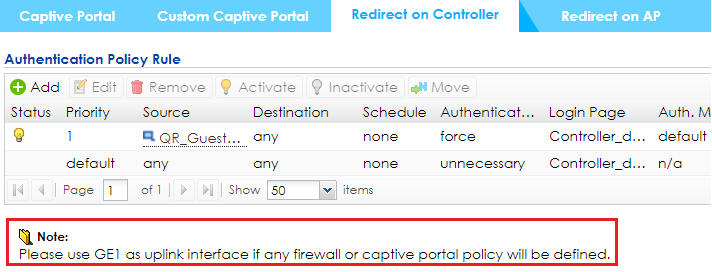
Configure Captive Portal 1 Go to CONFIGURATION > Captive Portal > Redirect on Controller > Authentication Policy Rule, click add to create a policy rule for guests whose IP addresses are in the setting range.
In User Auth Policy, change Source Address to QR_Guest_addr and Authentication is required. Check Force User Authentication to force every connected IP in the range to be redirected to captive portal. Change the Authentication Method to default.
In Authentication Type, use the Internal Web Portal.
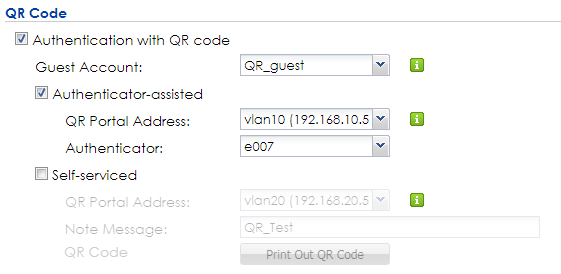
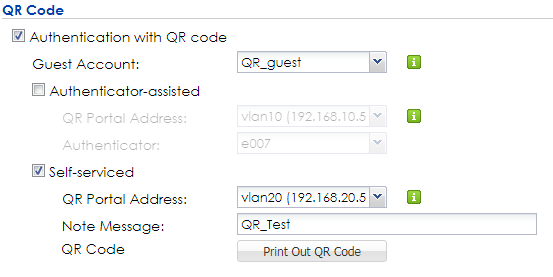
2 In the same page of step 1. Check the Authentication with QR code, and change the Guest Account to QR_Guest.
Check Authenticator-assisted and the QR Portal Address is vlan10 interface IP. The Authenticator is the employee account or group. Click Apply.
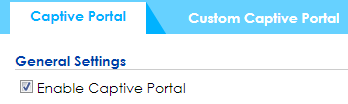
3 Go to CONFIGURATION > Captive Portal > Captive Portal. Check Enable Captive Portal. Click Apply.
4 Go to CONFIGURATION > Captive Portal > Redirect on Controller > QR Code Configuration. Check Print Out QR Code and use the QR code for customer to do self-service.
 Broadcast SSlD1 Go to CONFIGURATION > Wireless > AP Management > AP Group, click default to Edit. Change #1 to CP_QR and #2 to CP_employee.
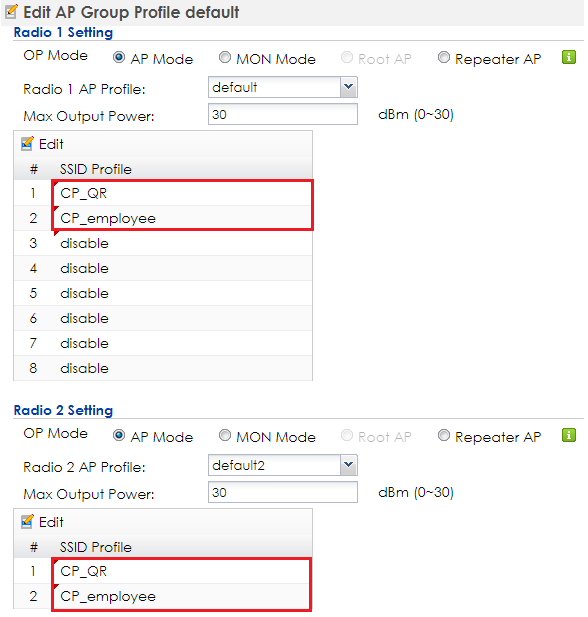
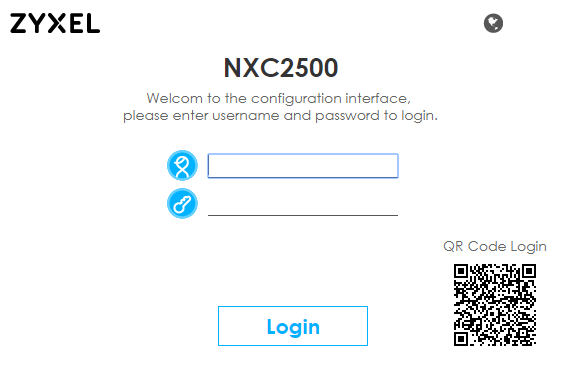
Test the Result 1 Authenticator-assisted i. When the guests connect to the SSID ‘CP_QR’, they get IP addresses between 192.168.20.100 to 192.168.20.110, and are redirected to captive portal with QR code as shown below.
 ii.
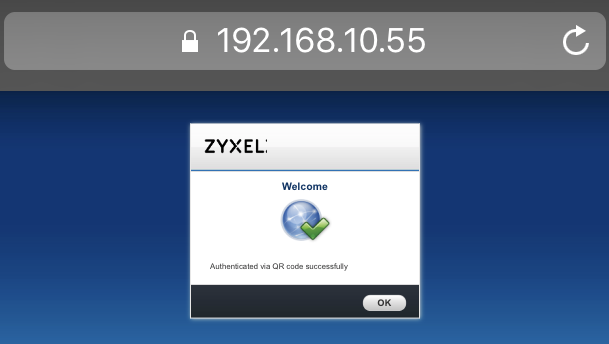
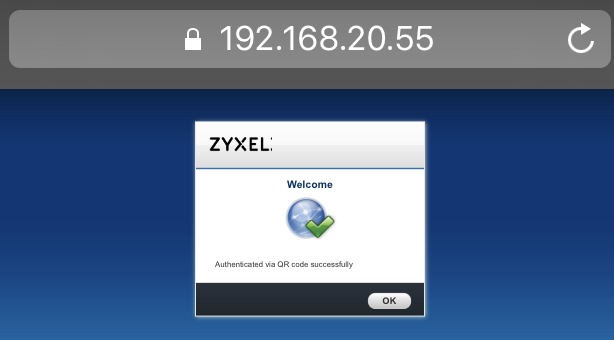
When the captive
portal page is shown, the customer asks for an employee who has connected with
SSID “CP_employee” and gets the employee’s help to scan the QR code. After the
employee scans the QR code, there’s a welcome page. The customer is able to
access the Internet after the welcome page display.
ii.
When the captive
portal page is shown, the customer asks for an employee who has connected with
SSID “CP_employee” and gets the employee’s help to scan the QR code. After the
employee scans the QR code, there’s a welcome page. The customer is able to
access the Internet after the welcome page display.
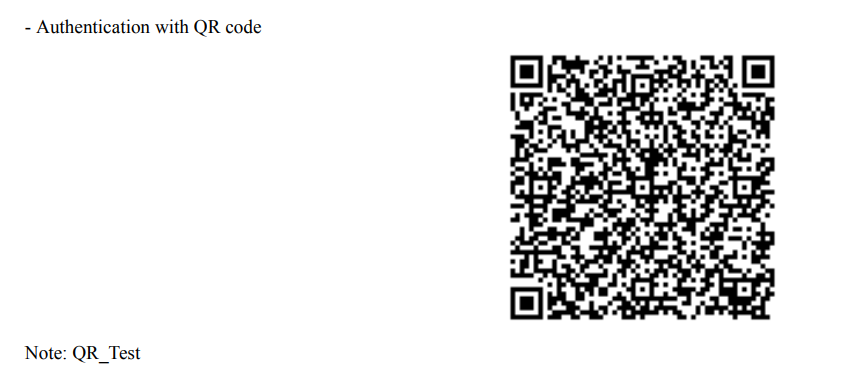
2 Self-serviced i. When the guests connect to the SSID ‘CP_RQ’, they get an IP addresses between 192.168.20.100 to 192.168.20.110, and is redirected to captive portal with QR code as shown below.
ii. When the captive portal page is shown, the guest scans the printed QR code in the last step. After scanning the QR code, a welcome page display and the guest is able to access the Internet.
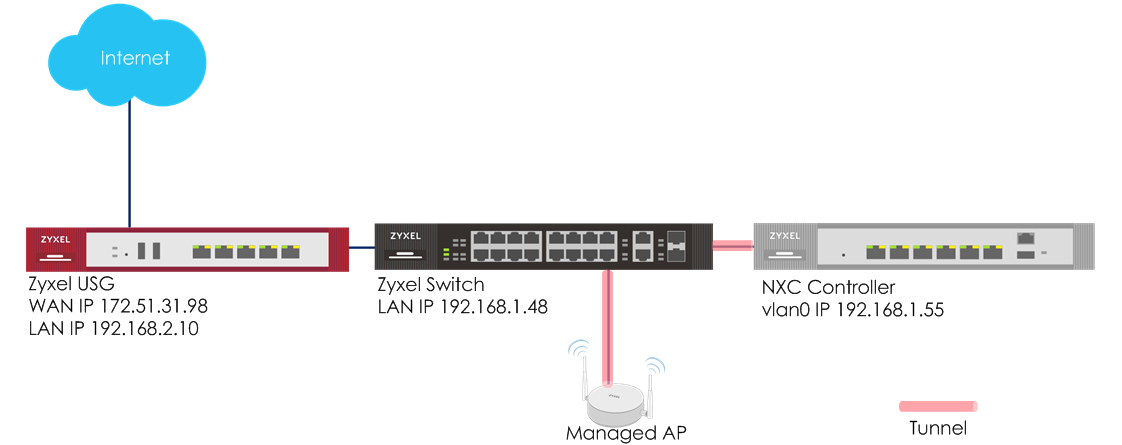
What Could Go Wrong 1 The DNS MUST be set in the DHCP server, or the captive portal might fail to redirect because NXC controller is not able to know the correct IP address of the website which stations want to access. 2 The captive portal fails to redirect the webpage if the station logs in to the NXC controller before and does not logout. 3 When USG is the gateway as shown in the topology below, the Forwarding Mode MUST be Tunnel mode to make sure the traffic from AP goes to NXC controller.
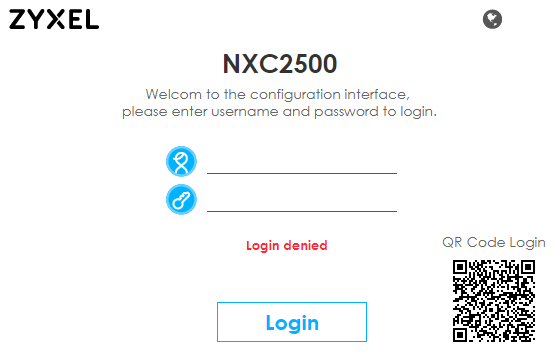
4 If the user enters an incorrect username or password, there is a login failure webpage. Please click Retry and use the correct username and password to log in.
 5 When
using the NXC2500 as the controller, the uplink port MUST be ge1.
5 When
using the NXC2500 as the controller, the uplink port MUST be ge1.
Tagged:
0


Categories
- All Categories
- 385 Beta Program
- 2.1K Nebula
- 116 Nebula Ideas
- 80 Nebula Status and Incidents
- 5.1K Security
- 75 USG FLEX H Series
- 247 Security Ideas
- 1.3K Switch
- 70 Switch Ideas
- 908 WirelessLAN
- 34 WLAN Ideas
- 5.9K Consumer Product
- 210 Service & License
- 335 News and Release
- 71 Security Advisories
- 21 Education Center
- 5 [Campaign] Zyxel Network Detective
- 1.9K FAQ
- 886 Nebula FAQ
- 415 Security FAQ
- 228 Switch FAQ
- 200 WirelessLAN FAQ
- 46 Consumer Product FAQ
- 137 Service & License FAQ
- 34 Documents
- 34 Nebula Monthly Express
- 73 About Community
- 63 Security Highlight