How to configure the switch to improve voice traffic quality (V4.70 and previous firmware version)

 Zyxel Employee


The example shows administrators how to use Voice VLAN to improve Voice traffic. Like the introduction in topic 6.2, Voice VLAN not only groups voice traffic into an assigned VLAN, but also assign the voice traffic a certain priority. Administrators can use this priority to improve Voice traffic quality. The Voice VLAN priority can be applied to both tagged and untagged voice traffic.
Note:
All network IP addresses and subnet masks are used as examples in this article. Please replace them with your actual network IP addresses and subnet masks. This example was tested using XGS4600-32 and GS2210-48HP.
1. Configure VLAN for voice traffic
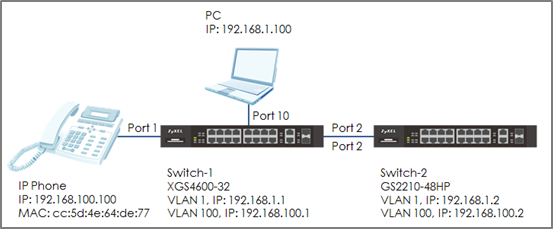
1-1. Configure VLAN 100 on Switch-1 and Switch-2. VLAN 100 is created for the Voice VLAN. Make sure that devices in VLAN 100 can communicate across Switch-1 and Switch-2.
2. Configure Voice VLAN
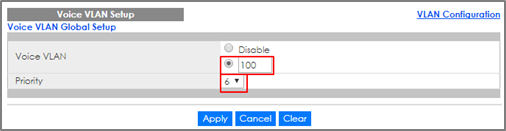
2-1. Enter the web GUI and go to: Menu > Advanced Application > VLAN > VLAN Configuration > Voice VLAN Setup. Key in the Voice VLAN. In this example, it is VLAN 100. Assign a priority to the traffic, for example, priority=6. Click “Add”.
Configure the OUI Setup: Enter the web GUI and go to: Menu > Advanced Application > VLAN > VLAN Configuration > Voice VLAN Setup. Set the OUI address. (You can key in the MAC address.) In this example, it is cc:5d:4e:64:de:77. Set up the OUI mask as ff:ff:ff:00:00:00. Click “Add”.

Note:
This will instruct the switch to process any traffic from devices with MAC address between cc:5d:4e:00:00:00 and cc:5d:4e:ff:ff:ff into the Voice VLAN.
3. Configure Mirroring (For "Test the Result")
3-1. To verify that results are acceptable, we have to use the mirroring function to check if the priority of the packet is what we assigned. Enter the web GUI and go to Menu > Advanced Application > Mirroring. Check the “Active” box. Key in the Monitor port, which is used to monitor the traffic. Check the port we want to mirror. In this example, it is port 2. Select the direction as “Both”. Click “Apply”.

4. Test the Result
4-1. Connect the PC and Switch-1. Open Wireshark to monitor the packet. Filter “arp || igmp”.
4-2. Use Switch-2 to ping IP Phone: Enter web GUI and go to Menu > Management > Diagnostic > Ping test. Switch-2 can ping IP Phone successfully.
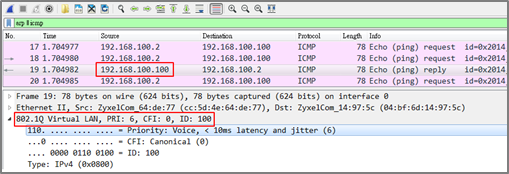
4-3. Check the packet from IP Phone (192.168.100.100) on Wireshark. The VLAN header should indicate the assigned Voice VLAN priority “6”.
5. What Could Go Wrong
5-1. If the priority is not the same as the setting in voice VLAN, please verify the MAC address of the IP phone. The MAC address can usually be found on the label or sticker underneath the IP phones. This MAC address must be within the range of the Voice VLAN OUI settings.
5-2. Here are the expected behaviors of IP phones based on the different settings. If you find the behaviors of the IP Phone is not the same as your expectation, please refer below:
5-2-1. If the IP Phone is VLAN enabled and this VLAN is the same as Voice VLAN: The Switch will keep the Voice VLAN and assign the priority setting to the IP phone. The IP phone will only recognize the tagged traffic. In this case, port 1 in VLAN 100 on Switch should be set as tagged out (check the TX tagging box).
5-2-2. If the IP Phone is VLAN enabled and this VLAN is different from the switch’s Voice VLAN: The Switch will not apply any changes on the VOIP traffic of the IP Phone.
5-2-3. If the IP Phone is VLAN disabled: The Switch will assign the Voice VLAN and priority setting to the IP phone’s VOIP traffic. This setting causes the IP Phone to only send and receive untagged traffic. In this case, port 1 in VLAN 100 on Switch should be set as untagged out (uncheck the TX tagging box).
5-3. Some computer network cards may not support the 802.1Q (VLAN) information. If you don’t see the 802.1Q information in Wireshark, you may need to use a different NIC. We recommend using USB network adapters.
Categories
- All Categories
- 383 Beta Program
- 2.1K Nebula
- 116 Nebula Ideas
- 80 Nebula Status and Incidents
- 5.1K Security
- 76 USG FLEX H Series
- 247 Security Ideas
- 1.3K Switch
- 69 Switch Ideas
- 907 WirelessLAN
- 34 WLAN Ideas
- 5.9K Consumer Product
- 209 Service & License
- 335 News and Release
- 71 Security Advisories
- 21 Education Center
- 5 [Campaign] Zyxel Network Detective
- 1.9K FAQ
- 890 Nebula FAQ
- 415 Security FAQ
- 233 Switch FAQ
- 203 WirelessLAN FAQ
- 46 Consumer Product FAQ
- 137 Service & License FAQ
- 34 Documents
- 34 Nebula Monthly Express
- 73 About Community
- 62 Security Highlight